
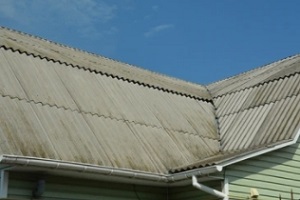
 Asbestos fibers were commonly used in siding construction between 1920 and 1980, until the negative health effects of asbestos were discovered. It is important to remove asbestos siding and replace it with a healthy and safe material to avoid symptoms such as shortness of breath, coughing, chest pain and tightness, respiratory complications, etc.
This review offers a step-by-step guide to replacing asbestos siding. However, to ensure the safety and efficacy of the project, it is strongly encouraged to hire a professional siding contractor.
The Process To Safely Replace Asbestos Siding
We strongly encourage hiring a professional for asbestos siding replacement as the job can be dangerous and complex. In addition, some municipalities require that you hire a professional. If you live in a municipality that does not require professional replacement of asbestos siding and you choose to do it yourself, make sure you follow the process below and have all the necessary materials and safety equipment listed.
Step 1: Gather Your Equipment, Tools And Materials
The first step is to gather everything you will need for the project. This includes safety equipment, construction tools, and your materials. Specifically, you should gather and organize:
- Polyethylene plastic sheeting
- Asbestos waste disposal bags
- Liquid cleaning detergent
- Disposable coveralls, gloves, and boots
- Safety goggles
- Pry bar and nail puller
- Utility knife
- HEPA respirator
- Garden hose w/ spray nozzle
- Garden pump sprayer
You may need additional materials depending on the type of siding, the age, and environmental factors. Since much of the equipment can be costly, it is often best to hire a professional who already has the asbestos siding replacement equipment necessary.
Step 2: Obtain The Proper Permit And Post Signs
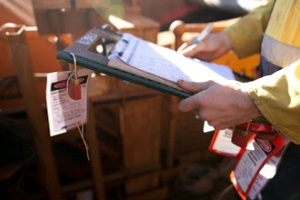 You may also need to obtain a permit depending on the area you live in. You can contact your local permit department, which can either provide you with an asbestos removal permit or direct you to the agency that can. You should also post signs around your property to let visitors and neighbors know to stay away during the duration of the asbestos removal project.
Step 3: Protect Yourself With Safety Equipment
You should make sure you protect yourself properly by wearing all of the necessary safety equipment. This, of course, includes anyone else who is assisting you or who is around the asbestos siding. Most notably, you should wear disposable clothing, gloves, boots, and safety goggles.
Step 4: Remove The Asbestos Siding
Once you are well equipped with safety equipment, the next step is to remove the asbestos siding. You can remove the siding by pulling the nails and prying each panel away one at a time. The goal is to limit how much is broken to reduce asbestos exposure. It is important to keep the siding wet with a soaking solution that includes cleaning detergent and immediately discard the siding into waste disposal bags, ensuring the siding does not touch the ground or any surfaces.
Step 5: Double-Bag Or Wrap Asbestos Containers
Polyethylene bags are recommended for disposing of the asbestos siding. It is best to double bag the asbestos siding to limit the amount of exposure. You can also use asbestos containers and wrap them as well.
Step 6: Clean Your Work Area
You should always keep yourself and the work area as clean as possible through the entire asbestos siding removal process. This should include using a pre-made cleaning solution regularly. Once the project is finished, conduct a thorough cleaning of the entire perimeter of your home.
Step 7: Remove And Dispose Of Contaminated Clothing And Equipment
It is best to dispose of any clothes that you wore while you were around the asbestos siding. Of course, you want to ensure you are not wearing any clothes that you value during the project, in addition to the disposable coveralls and other safety clothing you choose to wear. Any contaminated equipment should be disposed of as well.
Step 8: Remove The Asbestos And Debris
 The last step is to remove the asbestos and the rest of the possibly contaminated debris. Find your local disposal site and be sure to clearly mark all asbestos containers. Once you are finished, be sure to take one last long shower.
Once again, given the detailed process and the dangers involved with asbestos siding removal, we strongly recommend and encourage hiring a professional siding contractor to handle the process for you.
Hire A Professional For Asbestos Siding Replacement
The best way to ensure asbestos siding is removed safely is to hire a professional siding contractor. At Adelphia Exteriors, we have years of experience with siding removal and replacement, and we can assist you throughout the process. To learn more and to get the process started, give us a call at Speak To An Exterior Home Contractor (703) 386-7357 or send us a message today.